Defining Other Options for Ensemble
This chapter describes other options that you can define or configure for an Ensemble namespace. The following topics describe these settings:
Also see “Configuring the Message Bank Link,” later in this book.
Defining Data Lookup Tables
The Lookup Tables portal page allows you to create and configure data tables to support the Lookup and Exists utility functions. The Lookup utility function is provided so that you can easily perform a table lookup from a business rule or DTL data transformation.
For details, see “Ensemble Utility Functions” in Developing Business Rules.
The Lookup function works only after you have created a lookup table and have populated it with data. You can do this selecting Ensemble, Configure, and Data Lookup Tables. If you click Open, a dialog box lists the lookup tables that are defined in the namespace. Select a lookup table and Ensemble displays the following form:
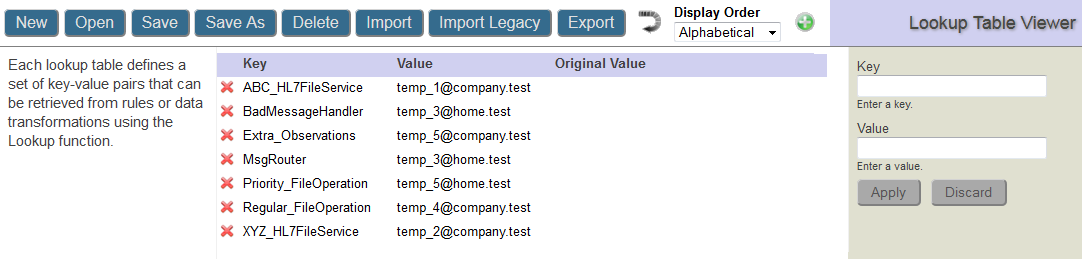
To edit entries in a lookup table, you can:
-
Delete an entry by selecting the red X icon. The entry is deleted when you save the table. Until you have saved the table, you can restore the entry by selecting the green + icon that is displayed to the left of the entry.
-
Update an entry by entering the same key as the entry and a new value in the form on the right and then selecting Apply. After you update the value, the original value is displayed in the Original Value column until you save the lookup table. Selecting an existing entry populates the form on the right with the entry’s current values.
-
Add a new entry by entering a new key and its value in the form on the right and selecting Apply.
-
Undo the previous action by selecting the curved arrow in the menu bar.
Selecting an entry has only one effect: initializing the values in the form on the right. Selecting Apply acts on the entry specified in the Key field not on the selected entry. If the key field matches an existing entry, that entry is updated. If the key field does not match an existing entry, then a new entry is added. Selecting the green + icon on the menu bar or selecting Discard clears the form but does not have any other effect.
You can take an action by selecting one of the following buttons:
-
New—Displays a form so that you can name the lookup table and then displays the empty table. Add entries to the table by entering in key and value pairs and selecting Apply for each pair. You must select Save to make the lookup table permanent.
-
Open—Displays the lookup tables defined in the current namespace and allows you to select one.
-
Save—Saves the current lookup table with any edits that you have applied. Clears the Original Value column and removes deleted records.
-
Save As—Saves the current table entries to a new table. Specify the new table name and select OK. Clears the Original Value column and removes deleted records.
-
Delete—Deletes the current table. If you have made any edits to the table since opening it, Ensemble asks if you want to leave the page. To delete the table, select Leave Page. If you select Stay on Page, Ensemble treats the current table as if it were a new table.
-
There are two ways to import lookup tables: Import Legacy and Import . An important difference between them is that when you are importing a lookup table with the same name as an existing lookup table, Import Legacy merges the existing table with the data from the file and Import replaces the existing lookup table with the data from the file.
-
Import Legacy—Imports the lookup tables defined in the file. If an imported lookup table has the same name as an existing table, the values are merged. If a key is defined in the file, it overwrites any existing value of that key in the lookup table.
-
Import—Adds new lookup tables that are defined in an XML file. If any of the new tables have the same name as an existing table, the new table replaces the old one. Select Browse to specify an XML file, then select Open. The form displays the LookUp Table (LUT) document or documents defined in the file. You can select all of the lookup tables or some of the lookup tables listed, then select Import to import the lookup table(s). The Import button can only import the new file format (see following note).
Note:There are two lookup table file formats: a new format and the legacy format. The new format contains additional XML Document tags. Import Legacy can handle both the new and the legacy format, but Import can only handle the new format. The new format is exported by Studio and by the Export portal button. The old format is exported by the Ens.Util.LookupTable.%Export() method. See Lookup Table File Format for a description of the lookup table file formats.
-
-
Export—Exports the current table to an XML file. Although you can specify the name of the file, the lookup table exported has the same name as the current lookup table and does not use the file name. You can export only using the current XML format; you cannot export the legacy XML format with this release.
You cannot undo the Delete, Import, or Import Legacy operation.
If there is an existing lookup table with the same name, the Import button has a different behavior from the Import Legacy button. The Import button completely replaces the contents of the existing lookup table. In contrast, the Import Legacy button merges the new values with the existing values.
For information on working with lookup tables in programs, see “Programmatically Working with Lookup Tables” in Developing Ensemble Productions.
The following subsections describe:
Lookup Table File Format
There are two XML formats that describe lookup tables: the new format and the legacy format.
The new Lookup Table XML format consists of one or more XML Document elements, for example:
<?xml version="1.0" encoding="UTF-8"?>
<Export generator="Cache" version="25" zv="Cache for Windows (x86-64) 2015.1 (Build 378U)"
  ts="2014-10-21 11:52:51">
  <Document name="AlertTable.LUT">
  <lookupTable>
      <entry table="AlertTable" key="ABC_HL7FileService">temp_1@company.test<></entry>
      <entry table="AlertTable" key="BadMessageHandler">temp_1@company.test</entry>
      <entry table="AlertTable" key="Extra_Observations">temp_5@company.test</entry>
      <entry table="AlertTable" key="MsgRouter">temp_3@home.test</entry>
      <entry table="AlertTable" key="Priority_FileOperation">temp_5@home.test</entry>
      <entry table="AlertTable" key="Regular_FileOperation">temp_4@company.test</entry>
      <entry table="AlertTable" key="XYZ_HL7FileService">temp_2@company.test</entry>
    </lookupTable>
  </Document>
</Export>
The XML elements have the following syntax:
-
Each Document element must has a name attribute that specifies the lookup table name and has a file type .LUT.
-
Each Document element contains one lookupTable element.
-
Each lookupTable element contains a list of entry elements.
-
Each entry element has a table attribute that specifies the same table name as specified in the Document name, specifies a key attribute, and specifies the value of the entry as text.
The legacy format exported by the Ens.Util.LookupTable.%Export() method and the portal in Ensemble 2014.1 and earlier versions does not have the Document element. It consists of just a single lookupTable element and the entry elements that it contains. It can contain entries for multiple lookup tables by specifying different names in the table element.
Importing Flat Files as Data Lookup Tables
You can import a flat file as a data lookup table, if the file is as follows:
-
It can include a header row.
-
It must include three values, separated by spaces, commas, tabs, or another delimiter.
-
From left to right, the three values must correspond to the Value column of a lookup table, the Key value of a lookup table, and the desired name of the lookup table.
To import such a file as a lookup table, use the Data Import Wizard, as described in “Importing Data from a Text File” in Using Caché SQL. For the schema name, use Ens_Util. For the table name, use LookupTable.
Defining System Default Settings
This section discusses system default settings. It includes the following sections:
Purpose of System Default Settings
The purpose of system default settings is to simplify the process of copying a production definition from one environment to another. In any production, the values of some settings are determined as part of the production design; these settings should usually be the same in all environments. Other settings, however, must be adjusted to the environment; these settings include file paths, port numbers, and so on.
System default settings should specify only the values that are specific to the environment where Ensemble is installed. In contrast, the production definition should specify the values for settings that should be the same in all environments.
To find the value for a setting for a production, business host, or adapter, Ensemble searches the following locations, in order:
-
The production definition. If Ensemble finds a value for a setting here (even if the value is an empty string), it uses that value.
-
The system default settings, which are stored outside the production definition.
If Ensemble finds a value here (even if the value is an empty string), it uses that value.
-
The value of the setting as specified in the definition of the class on which the production, business host, or adapter is based.
Ensemble uses this value only if there is no system default for the setting.
Some settings do not have any default value.
The PoolSize setting cannot be included in the system default settings. This setting is always controlled by the production.
When you configure a production, the labels are color-coded to indicate whether the value was set in the production, the system default settings, or the class definition. See “Understanding the Color Coding for Settings” for more information.
Accessing the System Default Settings
To access the System Default Settings page, select Ensemble, Configure, and System Default Settings. The System Default Settings page displays the settings defined in the namespace:
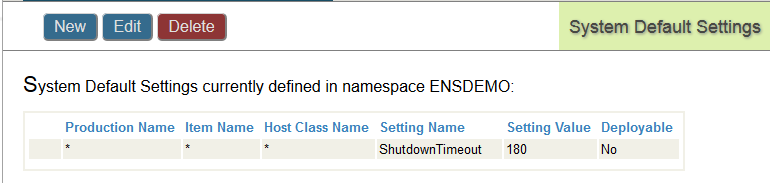
To create a new system default setting, click New. To edit an existing setting, select the setting and click Edit. To delete a setting, select the setting and click Delete.
The following elements define a system default setting:
-
Production Name—Optionally, specifies the production to which this default applies. If set to *, this default applies to all productions in the namespace.
Note:You cannot change the value of this field once you save the default. You must delete the default and create a new one.
-
Item Name—Optional, specifies the business host to which this default applies. If set to *, this default applies to all hosts in the production or in all productions.
-
Host Class Name—Optional, specifies the class of the business host to which this default applies. If set to *, this default applies to all hosts in the production or in all productions.
-
Setting Name—Specifies the name of the property to set. Note that property names do not include spaces. In most cases, the property name is similar to the setting name, with the spaces removed. For example, the setting Log Trace Events is based on a property called LogTraceEvents.
Tip:You can see the property name within the popup window that displays descriptive text for the setting.
-
Setting Value—Specifies the value to assign to the property. If this field is blank; it sets the default to an empty string.
-
Description—Optional, specifies a description of the default.
-
Deployable—If set, the system default setting can be deployed.
Creating or Editing a System Default Setting
If you are creating a new system default setting or editing an existing one, Ensemble displays the following form:
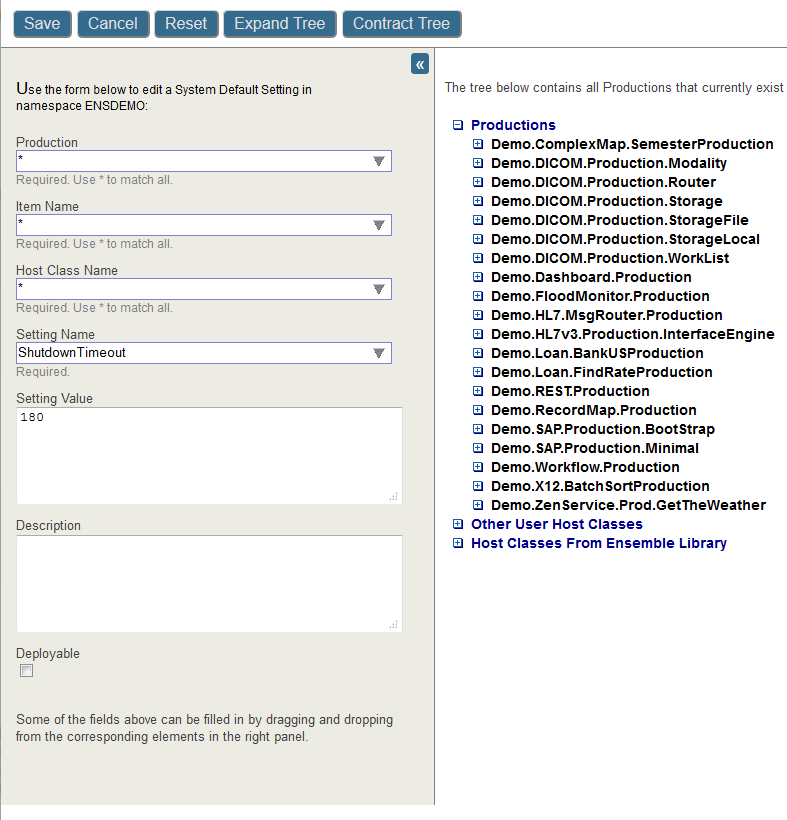
The System Default Setting page allows you to create a new system default setting or edit an existing one. For convenience it displays a tree of productions and other classes. This allows you to find existing settings and drag the names and values to the form. The Expand Tree and Contract Tree buttons and the plus and minus icons allow you to explore the tree to locate the property you are seeking.
When you have completed defining or updating the system default setting, click Save. The Cancel button discards any changes and returns to the list of system default settings without creating or updating a setting. The Restore button returns to fields to their initial values and allows you to edit the values.
Configuring Source Control Settings
Ensemble contains a template, EnsPortal.Template.devPageOpens in a new tab, to implement a browser-based interface to existing source control hooks. There is a flag to indicate whether the source control system requires a project context to be supplied to work correctly. The flag is activated as follows:
Set ^%SYS("Ensemble","SourceControl", $namespace, "ProjectContext") = 1
Existing user templates used as dialog windows in Studio must include the Ens_SourceControl.js in /csp/broker/ensemble/ (which can be referenced by the path ensemble/Ens_SourceControl.js) to manage your browser-based interactions. This inclusion is required both for CSP pages and Zen pages. Depending on the context required by your source control hooks, you may need to add some extra data to certain returns.
You can configure source control settings for each Ensemble namespace. For information on this, see the “Using Studio Source Control Hooks” appendix in Using Studio. Also see the Source Control Settings entry in the Caché Additional Configuration Settings Reference.