Using Windows Clusters with Caché
The Microsoft Windows Server platforms allow you to create an OS-level failover cluster on two or more nodes. You can then group and configure a set of shared resources—called a service in Windows Server 2008, a role in Windows Server 2012, and a group in Windows Server 2003—that runs on one cluster node but fails over to another if the original node fails. By grouping shared RAID or SCSI storage devices, IP addresses, and Caché instances in this way, you can create Caché failover clusters. (This chapter uses the term “service” from this point forward.)
Starting with one service, you can configure a single failover Caché cluster, in which one or more Caché instances run on the active node, failing over to a standby node if the active node goes down. You can also use multiple services to configure a multiple failover Caché cluster, in which multiple Caché instances run on different nodes, each instance failing over to another node if its host node goes down.
Before you add a Caché instance to a service as a shared resource, the service must include a shared IP address resource that clients will use to connect to Caché and a shared storage resource that will provide access to all storage used by the Caché instance. When you add the Caché instance, it must be dependent on these resources, meaning that Caché cannot run unless the IP address and storage are available.
For a Caché instance to be included in a service as a shared resource, it must be identically installed on all of the cluster’s nodes, so that each node can run Caché using the software, system files and databases on the shared storage. From the perspective of client connections to Caché, there is no change in the instance when it fails over from one node to another; the IP address for the instance—that is, the shared IP address—remains the same.
Before creating a Caché cluster in Windows Server systems, it is important to thoroughly understand Windows Server clustering technology. Go to http://technet.microsoft.comOpens in a new tab to obtain information about configuring OS-level failover clusters on the Windows Server version you are using.
This chapter contains the following subsections:
Caché Failover Cluster Examples
This section provides simple examples of a single failover Caché and a multiple failover Caché cluster. Bear in mind that the maximum number of nodes in a Windows Server failover cluster is eight (Windows Server 2003), 16 (Windows Server 2008), or 64 (Windows Server 2012), and that a service can be configured on multiple nodes. This means that Caché clustering topologies much more complex than those shown here can be created.
Single Failover Cluster Example
The following illustration shows a single failover Caché cluster on two nodes.
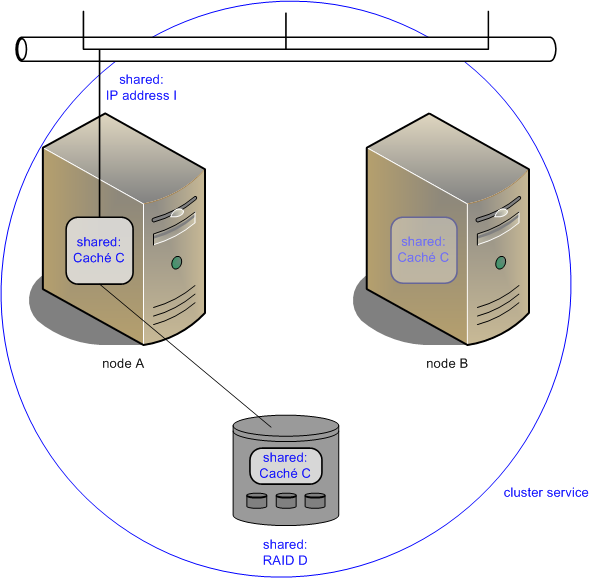
Caché instance C runs on node A, accepting client connections to shared IP address I and using storage on shared storage array RAID D. Note that IP address I is not the IP address of the cluster or of either node, but rather one dedicated to the service and shared within it. Note also that Caché instance C is installed on node B but inactive.
If cluster node A fails, the cluster looks like the following after failover has occurred:
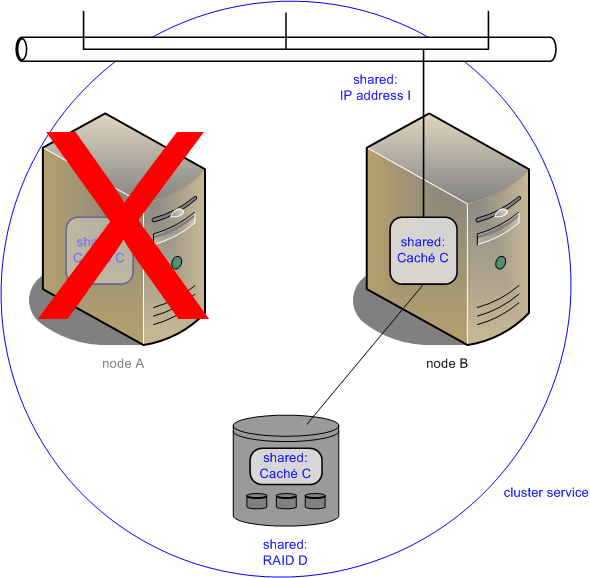
Caché instance C is still accepting client connections to shared IP address I and using storage on shared storage array RAID D, but it is now running on node B.
Multiple Failover Cluster Example
The following illustration shows a multiple failover Caché cluster on two nodes.
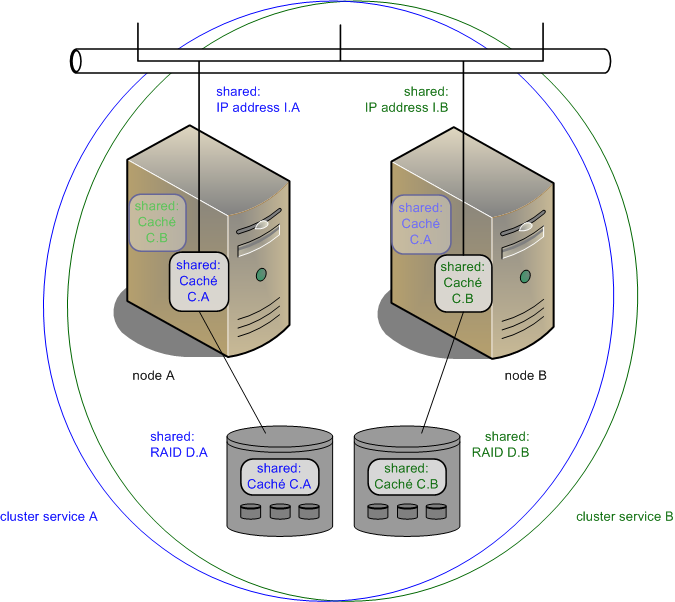
In service A, Caché instance C.A runs on node A, accepting client connections to shared IP address I.A and using storage on shared storage array RAID D.A; instance C.A is installed on node B but inactive. In service B, Caché instance C.B runs on node B, accepting client connections to shared IP address I.B and using storage on shared storage array RAID D.B; instance C.B is installed on node A but inactive.
If cluster node A fails, the cluster looks like the following after failover has occurred:
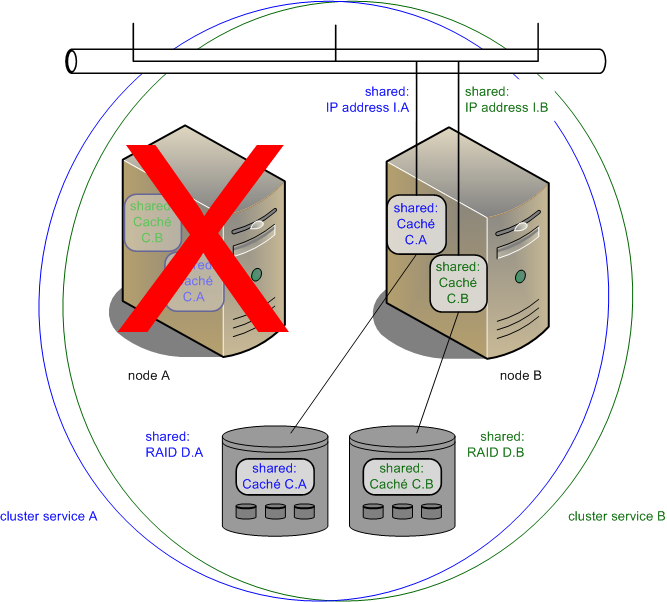
Caché instance C.A is still accepting client connections to shared IP address I.A and using storage on shared storage array RAID D.A, but is now running on node B. Caché instance C.B in service B is unaffected.
Creating a Caché Failover Cluster
This section provides procedures for creating the single failover Caché cluster described in Single Failover Cluster Example. They can be adapted to the multiple failover Caché cluster described in Multiple Failover Cluster Example by adding a second Caché instance to a second service, with the services having different preferred owners; this model can be extended in similar fashion to three or more nodes.
As noted in the procedure, you can include multiple Caché instances in a single service, whether in a single or multiple failover cluster; if you do so, they will all fail over together.
To create the single failover Caché cluster, you must
Create a Cluster Service with Shared IP Address and Storage
The name of the Windows Server cluster manager and the label it uses for the required cluster service depend on the version of Windows Server you are using. The instructions in the following sections use Windows Server 2008 terminology and labels.
If you are using Windows Server 2008, consult the appropriate Microsoft documentation at http://technet.microsoft.comOpens in a new tab for information about using the Failover Cluster Manager tool to create a service. If using Windows Server 2012, consult the appropriate documentation for using Failover Cluster Manager to create a role instead; if Windows Server 2003), use Cluster Administrator to create a group.
As previously noted, before Caché is installed, the service (or role, or group) must include a shared IP address resource and a shared storage resource. All storage to be used by the Caché instance to be installed must be on this shared storage resource.
For various reasons including deployment flexibility, InterSystems recommends that OS-level failover clustering and Caché failover clustering use separate services. For example, a quorum disk should be in an OS-level service, and the shared disk on which Caché is installed should be in a separate service, with similar treatment of shared IP addresses and other shared resources.
Install Caché
Install an instance of Caché on each cluster node, as follows. (For general information about installing Caché the “Installing Caché on Microsoft Windows” chapter of the Caché Installation Guide.)
-
Install Caché on the shared disks on the first cluster node on which the cluster service (or role, or group) is running.
-
To enable the cluster manager to start Caché, you must change the automatic startup setting of the newly installed instance by navigating to the Memory and Startup page (System Administration > Configuration > System Configuration > Memory and Startup) and clearing the Auto-start on System Boot check box. (For information about this and other memory and startup settings see Configuring System Information in the “Configuring Caché” chapter of the Caché System Administration Guide.)
-
The recommended best practice is to manage the cluster remotely from the launcher on a workstation connecting to the cluster IP address. To ensure that the Caché Launcher is not used locally on this cluster node, remove the shortcut that starts the launcher on Windows logon from the Windows Startup folder (C:\Documents and Settings\All Users\Start Menu\Programs\Startup). The shortcut has the same name as the instance.
-
Stop Caché. (This prevents the instance from being locked to the current node.)
-
Move the cluster service to the second cluster node.
-
Install Caché on the second cluster node. The instance must be installed with the same name and in the same directory as the instance on the first cluster node, using all the same install options.
-
Disable automatic startup and remove the launcher icons from the Startup folder as described in earlier steps for the first cluster node.
-
Stop Caché.
If any Caché instance that is part of a failover cluster is to be added to a Caché mirror, the ISCAgent, which is installed with Caché, must be properly configured; see Configuring the ISCAgent in the “Mirroring” chapter of this guide for more information.
For information about upgrading Caché in an existing failover cluster, see Upgrading a Cluster in the “Upgrading Caché” chapter of the Caché Installation Guide.
Create a Caché Resource
When you install Caché on an active cluster node, a new shared resource type, ISCCres2003, is added to Failover Cluster Management (or Cluster Administrator). Add a resource of this type to the service (or role, or group), and ensure that its properties reflect the following:
-
On the General tab of Failover Cluster Management, enter an appropriate name for the resource.
-
On the Dependencies tab, create dependencies on the shared physical disk resource and the shared IP address resource.
-
On the Policies tab:
-
Clear the If restart is unsuccessful, fail over all resources in this service or application check box.
-
Adjust Pending timeout to allow sufficient time for the Caché instance to shut down, and to restart following manual shutdown or failover (including potential journal recovery and transaction rollback). The latter will vary according to the circumstances and can in time be determined from experience; during initial setup, calculate a generous estimate. To cover the former, increasing the default value by the value of ShutdownTimeout configured for the Caché instance may be appropriate.
-
-
On the Advanced Policies tab:
-
In the Possible Owners list box, select cluster members on which Caché should be permitted to run.
-
In both Basic resource health check interval and Thorough resource health check interval sections, select Use standard time period for the resource type.
Important:When adding multiple Caché cluster resources to a service, select Run this resource in a separate Resource Monitor on the Advanced Policies tab for the second resource you add and every subsequent resource. If multiple Caché instances within a service do not run in separate resource monitors, failover does not function properly.
-
-
On the Parameters tab, in the Instance text box, enter the name of the Caché instance you installed on the cluster nodes.
Once you have created a Caché failover cluster, as a precaution, always shut down a Caché instance by using Failover Cluster Manager or Cluster Administrator to take the resource representing it offline, rather than stopping Caché using the Caché Launcher (cube) or a command-line operation. For example, if you are upgrading Caché, do not begin the upgrade procedure and allow the installer to stop Caché; instead, take the cluster resource offline, which stops Caché, then install the upgrade. While the cluster resource is offline, you can start and stop Caché as your needs dictate. When you are ready to resume operation of the cluster, bring the cluster resource back online.
CSP Gateway Considerations
For high availability solutions running over CSP, InterSystems recommends that you use a hardware load balancer for load balancing and failover. InterSystems requires that you enable sticky session support in the load balancer (see your load balancer documentation for directions on how to enable sticky session support); this guarantees that — once a session has been established between a given instance of the gateway and a given application server — all subsequent requests from that user run on the same pair. This configuration assures that the session ID and server-side session context are always in sync; otherwise, it is possible that a session is created on one server but the next request from that user runs on a different system where the session is not present, which results in runtime errors (especially with hyperevents, which require the session key to decrypt the request).
It is possible to configure a system to work without sticky sessions but this requires that the CSP session global be mapped across all systems in the enterprise and can result in significant lock contention so it is not recommended.
Caché protects server passwords in the CSP Gateway configuration file (CSP.ini) using Windows DPAPI encryption. The encryption functions work with either the machine store or user store. The web server hosting the CSP Gateway operates within a protected environment where there is no available user profile on which to base the encryption; therefore, it must use the machine store. Consequently, it is not possible to decrypt a CSP Gateway password that was encrypted on another computer.
This creates a situation for clustered environments in which the CSP.ini file is on a shared drive and shared among multiple participating computers. Only the computer that actually performs the password encryption can decrypt it. It is not possible to move a CSP.ini file containing encrypted passwords to another computer; the password must be reentered and re-encrypted on the new machine.
Here are some possible approaches to this issue:
-
Use a machine outside of the cluster as the web server.
-
Each time you fail over, reset the same password in the CSP Gateway.
-
Configure each computer participating in the cluster so that it has its own copy of the CSP Gateway configuration file (CSP.ini) on a disk that does not belong to the cluster. Caché maintains the file in the directory hosting the CSP Gateway DLLs. Save and encrypt the password on each individual computer before introducing the node to the cluster.
For example, where Disk C from each machine does not belong to the cluster and Caché is installed on Disk S, you may have the following:
CLUNODE-1: C:\INSTANCEDIR\CSP\bin\CSP.ini with password XXX encrypted by CLUNODE-1
CLUNODE-2: C:\INSTANCEDIR\CSP\bin\CSP.ini with password XXX encrypted by CLUNODE-2
-
Disable password encryption by manually adding the following directive to the CSP.ini file before starting the CSP Gateway and adding the passwords:
       [SYSTEM]
       DPAPI=Disabled
See the CSP Gateway Configuration Guide for more information.