Building a Simple Application with Studio
This chapter contains a tutorial that illustrates some basic features of Studio. The tutorial shows you how to create a database application that is a phone book, containing names and phone numbers.
The phone book application consists of:
-
A database in which you can store names and phone numbers.
-
An interactive user interface on a Web page (an HTML form) that allows you to add new entries, search for entries, and edit entries in the phone book.
The tutorial demonstrates how to use Studio to:
-
Create a Caché Project to manage the source code for the application.
-
Define the application's database using a persistent database class.
-
Create a Web-based (HTML) user interface for the application using Caché Server Pages (CSP).
-
Create a Web-based (HTML) user interface for the application using InterSystems Zen.
Creating a Project
First, create a new project named Phone Book to manage the source files for the application, as follows:
-
Start Studio; right-click the Caché cube and select Studio.
Studio connects to the local Caché server using the namespace used most recently by Studio (or displays the namespace dialog if this is the first time Studio is connecting).
If Studio is not connected to the namespace in which you want to work, connect to a different namespace using the File > Change Namespace.
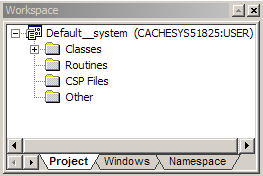
By default, Studio displays the Workspace window and creates a new project called Default_system. The Studio Workspace window indicates the name of the current project as well as the server connection and namespace name. The Workspace window should be displayed by default; if you don't see it, display it using the View > Workspace or with the Alt-3 keyboard accelerator.
-
To save your new project, select File > Save Project As and enter Phone Book.
You can save this project to the Caché server at any time using the File > Save Project.
Creating a Database
The Phone Book application is a database containing people's names and phone numbers, stored using a set of persistent objects. These objects are defined by a persistent class called Person. For sake of organization you can place this class in a package called PhoneBook.
The persistent class Person contains two properties (or fields): Name and PhoneNumber.
Defining a New Class
You can define this new Person class using Studio's New Class wizard by following these steps:
-
Start the New Class wizard by selecting File > New > General tab.
-
Double-click Caché Class Definition.
-
On the first page of the New Class wizard, enter a package name, PhoneBook and a class name, Person. Select Next.
-
Select Persistent from the list of available class types. Select Finish.
You see a Class Editor window containing the definition of your new class:
Class PhoneBook.Person Extends %Persistent
{
}
Adding Properties
Add the Name and PhoneNumber properties to the definition of the Person class with the New Property wizard as follows:
-
Select Class > Add > Property to start the New Property wizard.
-
Enter a name for the new property, Name, andselect Finish.
Your class definition includes a property definition:
Class PhoneBook.Person Extends %Persistent { Property Name As %String; } -
Select Class > Add > Property. Enter PhoneNumber. Select Finish.
Class PhoneBook.Person Extends %Persistent
{
    Property Name As %String;
    Property PhoneNumber As %String;
}
You could have also added the PhoneNumber property by copying, pasting, and modifying the Name property directly into the Class Editor window. Items are indented to structure the code to improve readability. A plus/minus expansion box is provided to the left of each item so that you can collapse sections of the code that you are not currently looking at.
Saving and Compiling Your Class
Save this class definition to the database and compile it into executable code with Build > Compile or select the Compile icon  .
.
You now have a PhoneBook.Person class defined in your database.
Viewing Documentation for Your Class
View the automatically generated documentation for this class in the Caché online class reference with View > Show Class Documentation. To enter descriptions for your class and properties so that they appear in the online documentation, you can enter descriptions above class member declarations using /// (three slashes) or you can do the following:
-
Select the Class Inspector and view Class keywords (make the left column header of the inspector display the word Class)
-
In the Inspector, double-click the keyword Description.
-
This opens an editor in which you can enter a description for your class, such as the following:

-
Select OK when you are finished.
-
Save your class and view the documentation again.
Creating a Web User Interface using CSP
The user interface of the Phone Book application is a Web page containing an HTML form that lets you edit and view data, name and number, for a person in the database. You create this Web page using a CSP file that contains a form bound to the persistent PhoneBook.Person class.
Creating a CSP File
You can create a CSP file in Studio using the Web Form wizard as follows:
-
Create a new CSP file by selecting File > New > CSP File tab > Caché Server Page.
A CSP Editor window is displayed containing source for the new CSP page entitled Unititled.csp.
-
Select File > Save.
-
In the Save As dialog, double-click /csp/user to open this directory. Enter Person.csp. Select Save As.
-
In the editor window, position the cursor in the <BODY> section of the CSP source file. Delete the words “My page body.” Select Tools > Templates > Templates. Select Web Form Wizard from the list.
-
Select the PhoneBook.Person class and select Next.
-
Select the Name and PhoneNumber properties from the list of available properties. They should be displayed in the Selected Properties list.
-
Select Finish.
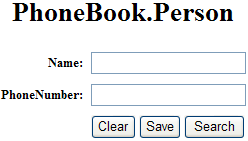
The Web Form Wizard places HTML source for a bound form in the CSP Editor window:
<html>
<head>

<!-- Put your page Title here -->
<title>        Cache Server Page </title>

</head>

<body>
<!-- Put your page code here -->

<head>
<title>Cache Server Page - PhoneBook.Person (USER)</title>
</head>
<h1 align='center'>PhoneBook.Person</h1>
<!-- This function is needed by the search button on the form -->
<script language='javascript'>
<!--
function update(id)
{
     #server(..formLoad(id))#;
     return true;
}

// -->
</script>

<!-- use CSP:OBJECT tag to create a reference to an instance of the class -->
<csp:object name='objForm' classname='PhoneBook.Person' OBJID='#(%request.Get("OBJID"))#'>

<!-- use csp:search tag to create a javascript function to invoke a search page -->
<csp:search name='form_search' classname='PhoneBook.Person' where='%Id()' options='popup,nopredicates'
onselect='update'>

<form name='form' cspbind='objForm' cspjs='All' onsubmit='return form_validate();'>
<center>
<table cellpadding='3'>
        <tr>
                <td><b><div align='right'>Name:</div></b></td>
                <td><input type='text' name='Name' cspbind='Name' size='50'></td>
        </tr>
        <tr>
                <td><b><div align='right'>PhoneNumber:</div></b></td>
                <td><input type='text' name='PhoneNumber' cspbind='PhoneNumber' size='50'></td>
        </tr>
        <tr>
                <td> </td>
                <td><input type='button' name='btnClear' value='Clear' onselect='form_new();'>
        <input type='button' name='btnSave' value='Save' onselect='form_save();'>
        <input type='button' name='btnSearch' value='Search' onselect='form_search();'></td>
        </tr>
</table>
</center>
</form>
</body>
</html>
Saving and Compiling Your CSP File
Save and compile the CSP file by selecting Build > Compile or Ctrl-F7 or the Compile icon.
Viewing Your Web Page
View the Web page in a browser by selecting View > Web Page or the Web Page icon  .
.
To learn more about using CSP to create Web pages, see the book Using Caché Server Pages (CSP).
Creating a Web User Interface using Zen
Zen supports several approaches to creating Web-based forms like the CSP form PhoneBook.Person in the previous section. The same set of technologies provides the foundation for both CSP and Zen. Zen makes the development of fully-featured Web applications faster while building on the client/server communication features that CSP provides. The CSP/Zen relationship is explained further in the book Using Zen.
The tutorial in this section creates a Zen page, a Web-based user interface to the Phone Book project you began in this chapter. The general steps (details follow) are:
Making Your Class a Data Adaptor
This step takes the PhoneBook.Person class that you developed for the project you began in this chapter, and converts it to work as a Zen data adaptor. This is the quickest way build a Zen user interface based on an existing class:
-
Open the PhoneBook.Person class.
-
Display the Studio Inspector window by selecting View > Inspector. If not already showing, in the left column header, select Class from the drop-down list. An alphabetical list of class keywords displays.
-
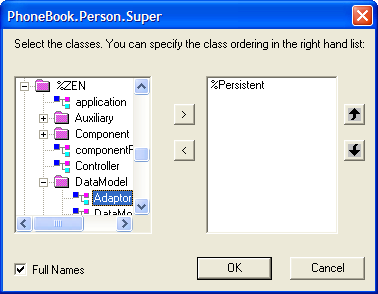
Find the Super keyword and select to highlight. The field currently holds the class name %PersistentOpens in a new tab and an ellipsis (...). Select the ellipsis. This opens a dialog in which you can choose superclasses in addition to %PersistentOpens in a new tab.
-
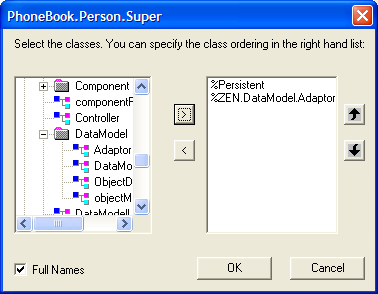
In the left-hand column of the dialog, navigate to the %ZEN.DataModel.AdaptorOpens in a new tab class and select to highlight. At the center of the dialog, select >, the right-angle bracket to place the %ZEN.DataModel.AdaptorOpens in a new tab class into the right-hand column underneath %PersistentOpens in a new tab.
-
Select OK.
-
Save and compile the PhoneBook.Person class.
Creating a Zen Page
This step creates a ZenPage class that you can edit to create the user interface for your project:
-
Choose File > New or Ctrl-N or the New icon
 .
. -
Select the Zen tab. Select New Zen Page. Select OK.
. The Zen Page Wizard displays:

-
Edit the dialog as follows:
-
Enter the Package Name: PhoneBook
-
Enter the Class Name: ZenPage
-
Enter the Page Name: My Telephone Book
-
Select Next.
-
-
Select Title Page for your initial page layout. Select Finish.
The Zen Page Wizard creates and displays a skeletal Zen page with template class parameters and the XML blocks XData Style and XData Contents. Notice the location of XData Contents in the class. You will edit this XML block to add items to your new Zen page:
XData Contents [XMLNamespace="http://www.intersystems.com/zen"] { <page xmlns="http://www.intersystems.com/zen" title=""> <html id="title">Title</html> <vgroup width="100%"> <!-- put page contents here --> </vgroup> </page> } -
Save and compile with Ctrl-F7.
. -
View the Web page by choosing View > Web Page or the View Web Page icon
. The only item visible so far is the Title text displayed by the <html> element:
-
If you look at the XData Contents block, you see that the <html> element contains an attribute id="title". id="title" refers to the style definition #title that appears in the XData Style block in the same ZenPage class. #title determines the background color, layout, and font choices that you see when you view the page. The default XData Style block for the Title Page layout looks like this:
XData Style { <style type="text/css"> /* style for title bar */ #title { background: #C5D6D6; color: black; font-family: Verdana; font-size: 1.5em; font-weight: bold; padding: 5px; border-bottom: 1px solid black; text-align: center; } </style> } -
Edit the text contents of the <html> element to provide a more meaningful title:
<html id="title">My Telephone Book</html>
-
Save and compile the class, then view the Web page. It should look like this:

Adding a Zen Form
Now that you have a ZenPage class to work with, you can edit the XML elements in its XData Contents block to add items to the display. In this exercise, you will begin by adding a form that allows you to add PhoneBook.Person objects to your database:
-
In Studio, open the ZenPage class.
-
Place <dataController> and <dynaForm> elements inside the main <vgroup> in XData Contents, exactly as shown in the following example:
XData Contents [XMLNamespace="http://www.intersystems.com/zen"]
{
  <page xmlns="http://www.intersystems.com/zen" title="">
    <html id="title">My Telephone Book</html>
    <vgroup width="100%">
      <dataController id="source" modelClass="PhoneBook.Person" modelId=""/>
      <dynaForm id="MyForm" controllerId="source" />
    </vgroup>
  </page>
}
Place the cursor between <vgroup> and </vgroup> and begin typing. (Delete the put page contents here line.)
After you type the character < Studio Assist displays a list of all elements. Typing <d brings you to the part of the list that includes <dataController> and <dynaForm>. Double-click on one of the choices to select it. Then type a space character and Studio Assist prompts you displays a list of attributes appropriate for that element. Continue in this manner until you have entered the entire line.
Alternatively, if you are viewing this document online, you can cut and paste the <dataController> and <dynaForm> lines from the example above.
-
Provide two <button> elements in XData Contents, exactly as shown below:
XData Contents [XMLNamespace="http://www.intersystems.com/zen"]
{
  <page xmlns="http://www.intersystems.com/zen" title="">
    <html id="title">My Telephone Book</html>
    <vgroup width="100%">
      <dataController id="source" modelClass="PhoneBook.Person" modelId=""/>
      <dynaForm id="MyForm" controllerId="source" />
      <button caption="New" onselect="zenPage.newRecord();" />
      <button caption="Save" onselect="zenPage.saveRecord();" />
    </vgroup>
  </page>
}
Type the new elements or, if you are viewing this document online, you can cut and paste the <button> lines from the example.
-
Save and compile with Ctrl+F7. View the Web page. It should look like this:
-
If you are curious about selecting the buttons New and Save, try it. An error message displays. Select OK to dismiss it.
To understand why you saw an error message when you selected the buttons, look carefully at the values of the onselect attribute for each <button> element in XData Contents. Each onselect value is a JavaScript expression that executes automatically whenever the button is selected.
In these examples, the onselect expression invokes a method that runs in JavaScript on the client. The special variable zenPage indicates that the method is defined in the current ZenPage class. The methods themselves are called newRecord and saveRecord.
In order to make these onselect values work, you must create client-side JavaScript methods in the ZenPage class. This is quite simple to do using the Zen Method Wizard in Studio.
Adding Client-side Methods
In this step you add methods that create new objects and save them in response to button selects. These methods permit you to use your Zen form to populate your database with objects of the PhoneBook.Person class:
-
In Studio, open the ZenPage class.
-
Position the cursor below the closing curly bracket of the XData Contents block, but before the closing curly bracket for the ZenPage class.
-
Choose Tools > Templates > Templates or press Ctrl-T to display the Studio Template dialog. Choose Zen Method Wizard. Select OK. The following dialog displays:
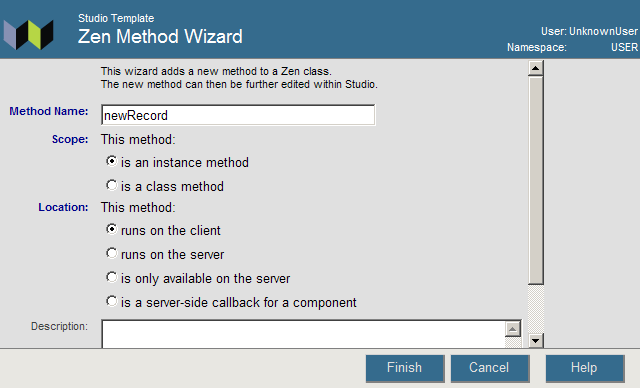
Edit the dialog as follows. (Note that you will need to scroll down to the bottom of the dialog.)
-
Enter the Method Name newRecord
-
Choose is an instance method
-
Choose runs on the client
-
Provide a Description as shown.
-
Clear the Try/Catch check box.
-
Select Finish. Your new method appears in the page class as follows:
/// Create a new instance of the controller object. ClientMethod newRecord() [Language = javascript] { // TODO: implement alert('Client Method'); } -
-
Change the code within curly brackets so the method now looks like this:
/// Create a new instance of the controller object. ClientMethod newRecord() [Language = javascript] { var controller = zenPage.getComponentById('source'); controller.createNewObject(); } -
Repeat the above steps to add the saveRecord method. When using the Zen Method Wizard, enter values in the dialog as follows:
-
Enter the Method Name saveRecord
-
Choose is an instance method
-
Choose runs on the client
-
Provide a Description of Create a new instance of the controller object.
-
Clear the Try/Catch check box.
-
Select Finish. Your new method appears in the page class.
Edit the new method so that it looks like this:
/// Save the current instance of the controller object. ClientMethod saveRecord() [Language = javascript] { var form = zenPage.getComponentById('MyForm'); form.save(); } -
-
Save and compile the class, then view the Web page.
-
Select the New button on the page. The Name and PhoneNumber fields become empty so that you can enter new information for the next entry. After you have typed in each field, select the Save button. The new entry is saved in the database.
-
Use New and Save repeatedly to add more entries.
Viewing the Database in a Table
Now that you have something in your database, you would like to be able to see it. In this step you will add a Zen table that displays the saved objects from your database. You will then modify the saveRecord method so that it automatically updates this table each time you select the Save button in the user interface:
-
In Studio, open the ZenPage class.
-
Provide one <tablePane> element inside the main <vgroup> in XData Contents, exactly as shown below. You can type the new element, or if you are viewing this document online, for convenience you may cut and paste the <tablePane> lines from this example:
XData Contents [XMLNamespace="http://www.intersystems.com/zen"]
{
  <page xmlns="http://www.intersystems.com/zen" title="">
    <html id="title">My Telephone Book</html>
    <vgroup width="100%">
      <dataController id="source" modelClass="PhoneBook.Person" modelId=""/>
      <dynaForm id="MyForm" controllerId="source" />
      <button caption="New" onselect="zenPage.newRecord();" />
      <button caption="Save" onselect="zenPage.saveRecord();" />
      <tablePane id="people"
                 sql="SELECT Name,PhoneNumber FROM PhoneBook.Person" />
    </vgroup>
  </page>
}
The <tablePane> sql attribute provides an SQL statement. SELECT lists the two properties from your PhoneBook.Person class, and FROM provides the full package and class name. This SQL query provides the data for the <tablePane>.
-
Save and compile the class, then view the Web page.
-
Use New and Save to add more entries to the database.
-
Select the browser refresh button to view the updated table. The new entries are visible.
-
Remove the need for the user to refresh after each new entry, by refreshing the table automatically after each save. To accomplish this, add two lines to the saveRecord method, so that it looks like this:
/// Save the current instance of the controller object. Method saveRecord() [Language = javascript] { var form = zenPage.getComponentById('MyForm'); form.save(); var table = zenPage.getComponentById('people'); table.executeQuery(); } -
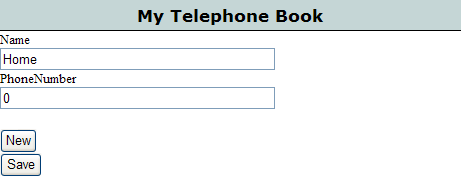
Save and compile the class, then view the Web page. It should look like this:

-
Use New and Save to add more entries to the database. Each time you select Save, the saveRecord method updates the table so that the newest entry becomes visible.
To learn more about Zen, see the book Using Zen.